 |
| I have my eye on you... |
Tuesday, July 19, 2011
It's been a while...
OK so it hasn't really been that long, but when you're unable to update your blog for your loyal followers, 5 days feels closer to an eternity. Today's entry won't be a personal grow blog, but have no fear, new pictures will be here Saturday. Today's post will act more like a Sunday Q&A, just disregard the fact that its actually Tuesday. SO, leave any questions, comments, concerns, witty remarks or any other form sentence, and I'll do my best to respond and/or answer your question. I'll depart with a fun picture; the two plants you see in the back are now several inches higher than the orange fence:
Thursday, July 14, 2011
KidBotanical's Personal Backyard Grow-Entry 4
Sorry for the delay folks, I've been pretty busy that last few days, but fear not, for Entry number 4 has arrived. These pictures are dated from the end of June, so my girls have aged about 1 month since my last personal grow Entry. Without further ado, here is my personal garden, aged 10 weeks:
That concludes this update, but rest assured, there are some cool and unique pictures coming up soon, that document what can happen to even the most experienced of gardeners. At Backyard Grow, I believe in the importance of teaching and learning through multiple forms of media, so expect video content within the next couple weeks, that will closely examine some of the many facets of backyard gardening. Until then, please enjoy all the pictures and content I've uploaded thus far, and, like your own personal garden, stay healthy.
 |
| My prize Sour Flower, a back-cross of Super Silver Haze, stands around 45 inched tall |
 |
| The largest of the 5 Casey Jones'... |
 | |||
| ...stands tall at 49 inches! |
 |
| Blue Dreams and Pepper Ak47s and White Widows, Oh my! |
 |
| You know what they say about California girls |
That concludes this update, but rest assured, there are some cool and unique pictures coming up soon, that document what can happen to even the most experienced of gardeners. At Backyard Grow, I believe in the importance of teaching and learning through multiple forms of media, so expect video content within the next couple weeks, that will closely examine some of the many facets of backyard gardening. Until then, please enjoy all the pictures and content I've uploaded thus far, and, like your own personal garden, stay healthy.
Sunday, July 10, 2011
Another Sunday, another Q and A
It's that day of the week again, when I'll answer even the strangest question you might have. I won't be able to answer for a couple days, as I'm taking a little vacation, but if you leave your question, it will be answered. Feel free to answer other gardeners' questions if you think you can, that way our collective knowledge can grow (ha ha). Enjoy your Sunday, readers!
 |
| Happy Sunday |
Saturday, July 9, 2011
KidBotanical's Personal Backyard Grow-Entry 3
**Please note, the first few entries of Personal Backyard Grow take place between April and June 2011. Once I am up to date, entries will be weekly with current pictures and video**
Hello again, KidBotanical here with another personal garden update. As you will see, some plants exhibit exponential growth in a very short period of time. In 6 weeks (mid April to the end of May), my girls have gone from small clones to large, thriving specimens.
The tallest plants you see above in the two most recent pictures are the hybrid strain Casey Jones. This particular strain seems to do quite well in arid conditions, as the extreme heat and sunlight seem not to phase my specimens. Below you can see my cluster of Blue Dream plants, once a winner of the illustrious Cannabis Cup:
Blue Dream is another strain that has proven to enjoy the heat, and forms the basis of my garden along with Casey Jones and White Widow. White Widow is another popular strain, as well as a winner of a Cannabis Cup. It never hurts to have award winning genetics in your garden, but remember that not all strains will succeed in all climates. Below are some pictures of my White Widows.
Not all plants were flourishing during the first 6 weeks of the season, however. This year I experimented with a new strain, Mazar, native to the desert conditions of Afghanistan. I expected this new strain to do well and thrive in the intense light and heat, but unfortunately it hasn't taken to the desert as well as I thought it would. It truly demonstrates how variables can be present in any garden setting.
However, it's good to have a little variety and experiment with what grows the best, produces the biggest yield and tastes the best. I stumbled upon Casey Jones and Jack the Ripper towards the end of the 2009 grow season, as I had a few deaths in the garden that had to be replaced. I wasn't expecting much, as they only had about 6 weeks to grow. These two strains surprised me though, and each earned a plot in the 2010 garden. Fastforward to the end of that grow season, Jack the Ripper and Casey Jones were my largest in plant and yield size, as well as being the highest in quality.
I'm only slightly behind in my Grow Entries now, but I should be up to date by this time next week. I don't want to spoil anything, but there are a LOT of changes between my garden in May and my garden now. Trust me, it'll be worth the wait!
Hello again, KidBotanical here with another personal garden update. As you will see, some plants exhibit exponential growth in a very short period of time. In 6 weeks (mid April to the end of May), my girls have gone from small clones to large, thriving specimens.
 |
| My girls in the middle of April |
 |
| Not quite the same angle, but you get the idea |
 |
| Closeup on a Casey Jones at 6 weeks of growth |
The tallest plants you see above in the two most recent pictures are the hybrid strain Casey Jones. This particular strain seems to do quite well in arid conditions, as the extreme heat and sunlight seem not to phase my specimens. Below you can see my cluster of Blue Dream plants, once a winner of the illustrious Cannabis Cup:
 | |
| Top left: White Widow. Everything else: Blue Dream |
Blue Dream is another strain that has proven to enjoy the heat, and forms the basis of my garden along with Casey Jones and White Widow. White Widow is another popular strain, as well as a winner of a Cannabis Cup. It never hurts to have award winning genetics in your garden, but remember that not all strains will succeed in all climates. Below are some pictures of my White Widows.
 |
| Hard to see: White Widows make up the back right corner up the garden |
 |
| Garden at 6 weeks, Widows in the left side of the picture |
 |
| Extreme discoloration and lack of growth indicate heat stress |
However, it's good to have a little variety and experiment with what grows the best, produces the biggest yield and tastes the best. I stumbled upon Casey Jones and Jack the Ripper towards the end of the 2009 grow season, as I had a few deaths in the garden that had to be replaced. I wasn't expecting much, as they only had about 6 weeks to grow. These two strains surprised me though, and each earned a plot in the 2010 garden. Fastforward to the end of that grow season, Jack the Ripper and Casey Jones were my largest in plant and yield size, as well as being the highest in quality.
I'm only slightly behind in my Grow Entries now, but I should be up to date by this time next week. I don't want to spoil anything, but there are a LOT of changes between my garden in May and my garden now. Trust me, it'll be worth the wait!
Thursday, July 7, 2011
Mega Feature: Time to Talk Nutrition
Nutrients: the building blocks of life, no matter what organism you may be. Humans get their nutrients through food and vitamins; plants get theirs primarily through the soil. As gardeners, it falls onto us to ensure our plants receive proper nutrition. Unless your backyard has exceedingly rich and loamy soil, pay close attention to find out how to maximize your plants' growth, from the nutritional perspective.
What you see above is my preferred method of fertilizing when the soil is high in organic material, simply known as foliar application, or "leaf application". For the last couple years I had been feeding my plants exclusively through the roots. I knew I had to change this year, as the compost I had ordered was quite high in wood chips and other organic material, meaning it would require additional nitrogen to be broken down into rich soil. Because of this, nitrogen entering the soil with water (during a typical root feeding) would not all be utilized by the Cannabis plant. So, instead of having my plants compete with organic material for precious Nitrogen, I switched to foliar feeding. If your soil doesn't hold water particularly well, or is high in organic material, consider foliar fertilizing a viable option to deliver the nutrients your plants need.
Now let's go into a little more detail, and explore what really makes up a balanced plant diet. Please note that if you have rich soil, either through your own natural backyard or by adding topsoil and other mixes, you will likely not encounter problems with lesser nutrients. Problems concerning Nitrogen and Phosphorus are far more common, and will probably make up the majority of your nutrition issues.
Nitrogen(N)- This guy is the basis of all plant growth. Plants with sufficient Nitrogen will look dark and healthy, with flexible branches and no leaf discoloration. Plants deficient in Nitrogen may have stunted growth, light colored leaves (ranging from lighter green to yellow, the less green the less healthy), and red, brittle branches. Excess Nitrogen may result in extremely dark and unhealthy leaves.
Phosphorus(P)- Phosphorus goes hand in hand with Nitrogen; N causes growth, P causes the bloom. Although Phosphorus is needed throughout the grow season for optimum plant health, it becomes much more critical in the final 2 months of the season, as your plants begin to bloom. The right amount of P during the vegetative phase will keep your plants growing healthy, and the right amount during your bloom phase will help produce a larger crop.
**Remember, lesser nutrients will show their first symptoms on younger leaves and progress to the whole plant. Always guide your actions by how the new growth looks towards the top of the plant.**
Phew. Seems like a lot to take in right? While all of the information above is helpful to know if you want a succesful harvest, it is not all neccesary to memorize. The two most important nutrients are Nitrogen and Phosphorus; if you can keep these two balanced at proper levels throughout the grow season, you will be very succesful. The lesser nutrients require much less mainteance, as a good fertilizer mix will provide you with sufficient amounts of said nutrients.
Until next time, this is KidBotanical, hoping you and your plants thrive.
 |
| Srpayin Away! It's time for the weekly foliar feed |
What you see above is my preferred method of fertilizing when the soil is high in organic material, simply known as foliar application, or "leaf application". For the last couple years I had been feeding my plants exclusively through the roots. I knew I had to change this year, as the compost I had ordered was quite high in wood chips and other organic material, meaning it would require additional nitrogen to be broken down into rich soil. Because of this, nitrogen entering the soil with water (during a typical root feeding) would not all be utilized by the Cannabis plant. So, instead of having my plants compete with organic material for precious Nitrogen, I switched to foliar feeding. If your soil doesn't hold water particularly well, or is high in organic material, consider foliar fertilizing a viable option to deliver the nutrients your plants need.
Now let's go into a little more detail, and explore what really makes up a balanced plant diet. Please note that if you have rich soil, either through your own natural backyard or by adding topsoil and other mixes, you will likely not encounter problems with lesser nutrients. Problems concerning Nitrogen and Phosphorus are far more common, and will probably make up the majority of your nutrition issues.
Nitrogen(N)- This guy is the basis of all plant growth. Plants with sufficient Nitrogen will look dark and healthy, with flexible branches and no leaf discoloration. Plants deficient in Nitrogen may have stunted growth, light colored leaves (ranging from lighter green to yellow, the less green the less healthy), and red, brittle branches. Excess Nitrogen may result in extremely dark and unhealthy leaves.
 |
| Leaves of all these colors (too light and too dark) can indicate a Nitrogen problem |
Phosphorus(P)- Phosphorus goes hand in hand with Nitrogen; N causes growth, P causes the bloom. Although Phosphorus is needed throughout the grow season for optimum plant health, it becomes much more critical in the final 2 months of the season, as your plants begin to bloom. The right amount of P during the vegetative phase will keep your plants growing healthy, and the right amount during your bloom phase will help produce a larger crop.
 |
| Lack of Phosphorus during the growth phase indicated by dark leaf pigmentation |
Potassium(K)- Potassium is involved with water status maintenance as well as some cellular activities. K is needed to maintain the overall health of the plant, and lack of it can reduce both quality and quantity from your Cannabis specimen. However, too much Potassium can interfere with the uptake of other lesser nutrients, including magnesium, manganese, zinc and iron as well as calcium.
 |
| Leaf discoloration as well as a weak and brittle stem indicate a Potassium deficiency |
Magnesium(Mg)- Magnesium is a component of the chlorophyll pigment, and is involved with many enzyme actions as well. Simply put, Mg is not a major element in the gardening process, but it necessary to maintain a healthy specimen. Many nutrient mixes will have small amounts of Magnesium as well as other lesser nutrients to ensure you feed your plant a balanced diet.
 |
| Leaf discoloration and curling in an otherwise healthy plant may indicate a Magnesium problem |
Zinc(Zn)- Zinc is another lesser nutrient, and plays a similar role in enzyme reactions to Magnesium and Manganese. Like Mg, Zinc can be locked out at high levels of pH, so make sure your fertilizing water is between a pH of 6 and 7. Foliar feeding completely bypasses the roots, though, allowing you to avoid dealing with pH concerns.
 |
| A true Zinc deficiency, complete with extremely light coloring between the veins of the newer leaves |
Sulfate(S)- Sulfate is involved in plant respiration, as well as synthesis and breakdown of fatty acids. It's another lesser nutrient, like Potassium, Magnesium, and Zinc, but its role is just as important as Nitrogen or Phosphorus. If you have a Sulfate deficiency, you will notice yellowing leaves that begin to curl downwards, as well as a woody stem and an overall sickly looking specimen.
 |
| A woody stem, discolored leaves that curl downwards, and purplish upper stems point to a lack of Sulfate |
Iron(Fe)- Although a lesser nutrient, Iron is critical for plant health and development. It is responsible for maintaining several different functions, including the management and uptake of Nitrogen and Phosphorus. Similar to other nutrients, Iron becomes unavailable to your Cannabis plants if the pH of the water or soil is too high. Again, you can foliar feed to bypass your pH problems, as it may be a problem
 |
| Lack of Iron can be observed when new growth is discolored between the veins |
Manganese(Mn)- Another lesser nutrient, Manganese regulations many enzyme functions and is an important component to a healthy Cannabis specimen. Like all of the other lesser nutrients, Mn becomes unavailable if the pH is too high. Lack of Mn can result in blotchy leaf coloration and even leaf necrosis (dead spots of tissue on leaves), as can be seen to the right.
 |
| Spotting and Necrosis, as well as general leaf discoloration all point to a Manganese problem |
**Remember, lesser nutrients will show their first symptoms on younger leaves and progress to the whole plant. Always guide your actions by how the new growth looks towards the top of the plant.**
Phew. Seems like a lot to take in right? While all of the information above is helpful to know if you want a succesful harvest, it is not all neccesary to memorize. The two most important nutrients are Nitrogen and Phosphorus; if you can keep these two balanced at proper levels throughout the grow season, you will be very succesful. The lesser nutrients require much less mainteance, as a good fertilizer mix will provide you with sufficient amounts of said nutrients.
The final aspect of a balanced plant diet are hormones. These aren't the hormones bodybuilders use, or the ones put in your cows to make bigger burgers, these hormones increase plant growth and vitality. There's only one brand I know of, SuperThrive, and you can find it in the garden section of a Lowe's or Home Depot, or any garden specialty store. Seen below, between my other main fertilizers, is a bottle of SuperThrive.
 |
| Potent fertilizers and hormones; the backbone of any successful grow, available wherever garden products are sold |
Tuesday, July 5, 2011
KidBotanical's Personal Backyard Grow-Entry 2
**Please note, the first few entries of Personal Backyard Grow take place between April and June 2011. Once I am up to date, entries will be weekly with current pictures and video**
In Entry 1, my primary purpose was to show you all the backyard setup in which I grow. Now it's time to see the garden in action, starting from the smallest step: the cutting, or clone. Most clones are sold between 2 and 3 weeks of age (meaning between 2 and 3 weeks since they were cut from their mother plant), and many will have grown by the time you put them in the ground. However, not all clones are equal, and some may perish by the time they are planted. For this reason, I recommend purchasing extra clones, as an insurance policy against misfortune or personal error. That is my usual process, and as you can see below I ended up with quite a few extras:
Once your garden space is completely prepared (with properly mixed soil, sun protection if neccessary, and plans for water and insect management), its time to bring it to life. If you wish to take the clone/cutting route, I recommend browsing nearby dispensaries to compare, as you'll want only the highest quality genetics in your garden. If you have no access to a dispensary or clones, the only other option is seeds. Seeds ship internationally from all over the world, but they are still federally illegal to posses, and you always run the risk of losing your seeds if you import them from another country. A little over 4 years ago, I tried to have $300 in award-winning seeds shipped from The Netherlands, only to receive a message from the government informing me that my package had been seized. Needless to say I was a little upset. Today seeds can be shipped from the continental U.S (mainly from Colorado and British Columbia), and combining that with a more lax Cannabis regulation allows seeds to reach growers with much less hassle than in previous years
Once planted, you will need to observe your green babies very carefully. It's helpful to have an idea of each week's weather during the infantile stage of the grow season, as adverse weather may even kill some of your crop. Wind, rain, and even a late frost will punish your crop the same way they affect large scale produce. At their youngest stage, Cannabis specimens are quite delicate, and therefore must be watered and fertilized carefully. For this reason, I used a watering can rather than a hose for initial watering, as it has a much gentler touch. As for fertilizing, follow the special instructions on the container for seedlings and cuttings/clones, and consider reducing the amount if the plants have been in the ground for less than 3 weeks. As you can see, the dilution scale calls for only a small amount of fertilizer per gallon of water:
Some clones or seedlings may show signs of nutrition burn (excess of 1 or more nutrients in the plant system) despite all the caution you have taken. Do not be alarmed. When cut from their mother plant, the clones were likely given too much fertilizer, causing some of the leaves to look a little funky and burned, such as the OG Kush clone below:
There wasn't a whole lot happening in the early weeks of the grow season, especially when you have quality genetics, and monitor the watering as well as possible insect activity. Initially, some specimens may require more water than others, so be very careful not to overwater any of your baby plants. Once the season is underway, and all specimens begin to develop quicker, the amount of water required will be much closer. For more specifics on insects in your area, look up insects + your climate or geographical location.
In Entry 1, my primary purpose was to show you all the backyard setup in which I grow. Now it's time to see the garden in action, starting from the smallest step: the cutting, or clone. Most clones are sold between 2 and 3 weeks of age (meaning between 2 and 3 weeks since they were cut from their mother plant), and many will have grown by the time you put them in the ground. However, not all clones are equal, and some may perish by the time they are planted. For this reason, I recommend purchasing extra clones, as an insurance policy against misfortune or personal error. That is my usual process, and as you can see below I ended up with quite a few extras:
 |
| Extra clones! I had enough dirt leftover to fill 3 more bags, but that left 6 clones without homes. |
Once your garden space is completely prepared (with properly mixed soil, sun protection if neccessary, and plans for water and insect management), its time to bring it to life. If you wish to take the clone/cutting route, I recommend browsing nearby dispensaries to compare, as you'll want only the highest quality genetics in your garden. If you have no access to a dispensary or clones, the only other option is seeds. Seeds ship internationally from all over the world, but they are still federally illegal to posses, and you always run the risk of losing your seeds if you import them from another country. A little over 4 years ago, I tried to have $300 in award-winning seeds shipped from The Netherlands, only to receive a message from the government informing me that my package had been seized. Needless to say I was a little upset. Today seeds can be shipped from the continental U.S (mainly from Colorado and British Columbia), and combining that with a more lax Cannabis regulation allows seeds to reach growers with much less hassle than in previous years
Once planted, you will need to observe your green babies very carefully. It's helpful to have an idea of each week's weather during the infantile stage of the grow season, as adverse weather may even kill some of your crop. Wind, rain, and even a late frost will punish your crop the same way they affect large scale produce. At their youngest stage, Cannabis specimens are quite delicate, and therefore must be watered and fertilized carefully. For this reason, I used a watering can rather than a hose for initial watering, as it has a much gentler touch. As for fertilizing, follow the special instructions on the container for seedlings and cuttings/clones, and consider reducing the amount if the plants have been in the ground for less than 3 weeks. As you can see, the dilution scale calls for only a small amount of fertilizer per gallon of water:
 |
| Fox Farm Big Bloom: 1 Tablespoon (0.5 fluid oz) per gallon of water for seedlings and clones |
Some clones or seedlings may show signs of nutrition burn (excess of 1 or more nutrients in the plant system) despite all the caution you have taken. Do not be alarmed. When cut from their mother plant, the clones were likely given too much fertilizer, causing some of the leaves to look a little funky and burned, such as the OG Kush clone below:
 |
| Some leaves are canoeing (folding upwards) and look dry and unhealthy, despite having a dark green color. |
There wasn't a whole lot happening in the early weeks of the grow season, especially when you have quality genetics, and monitor the watering as well as possible insect activity. Initially, some specimens may require more water than others, so be very careful not to overwater any of your baby plants. Once the season is underway, and all specimens begin to develop quicker, the amount of water required will be much closer. For more specifics on insects in your area, look up insects + your climate or geographical location.
Sunday, July 3, 2011
Sunday Special: Q and A
 |
| Lazy Sunday with the girls |
As you browse over BackyardGrow, you'll undoubtedly have questions about some of the content. You may also have questions not pertaining to anything I've discussed yet, and that is quite alright too. Starting today I'll be running a Q and A type feature every Sunday, where I can address any particular question you may have. You can leave these questions in comment area below, or if you wish to remain anonymous, you may send me a private message. Don't be shy with your questions, and remember that everyone is newbie at some point.
Until next time, this is KidBotanical wishing you luck with all your garden endeavors.
Saturday, July 2, 2011
KidBotanical's Personal Backyard Grow-Entry 1
**Please note, the first few entries of Personal Backyard Grow take place between April and June 2011. Once I am up to date, entries will be weekly with current pictures and video**
Anyone can give advice, ranging from what to eat, watch, drink, and even what to do with your backyard garden. But, how many people can back up their advice with fact and evidence? Here at Backyard Grow, I plan to take full advantage of my unique situation by backing up my claims with one of a kind documentation. This means you, the up and coming gardener, gets access to the best tips and techniques that don't just work in theory, they are proven to work in a backyard setting.
So then, consider this the introudction to KidBotanical's personal Backyard Grow:
 |
| California Dreamin: Garden and Pool in one backyard |
Until I record some videos (its well over 110 degrees outside right now, so this may take a few days), all I have are tons of pictures. What you see above is the finished product of a couple years' planning and labor. I wouldn't call myself an expert or a professional, but to become an experienced gardener takes time, trial, and error, even if they have an encyclopedia of growing at their disposal. Now then, what exactly is this setup? Because of the extreme heat and sun this location faces, it became apparent that my Cannabis crop needed shading, and this is what you see: A durable shade structure built primarily from wood with concrete bases. The shade cloth you see (rated at 22% light reduction) not only eases the Sun's harsh light, but also helps to diffuse and spread the light evenly among the plants. On the top of the garden structure is the same sun shade material, reducing 22% of all light that shines through the top of the structure. If your grow season is uncomfortably warm and sunny like mine (putting it mildly), I would strongly recommend this sun shade cloth, as excess sunlight can damage any Cannabis specimen.
The orange plastic fencing you see is definitely optional, but if you have any pets or small children, constructing a barrier (even if it's as flimsy as plastic fencing) will help keep them out of the garden. The next feature of this garden is its nearly automatic watering system, pictured here:
 |
| Tubes...Tubes everywhere |
 |
| Manifold delivering the water, up to 8 plants at a time! |
These tubes are connected to manifolds, and these manifolds deliver water based off sprinkler scheduling. Right now, I'm running over 20 minutes of water per day, divided up 4 times throughout the day. More information on water will be discussed next week and throughout BackyardGrow. Automatic watering is much more valuable when you start working with higher numbers of plants, but hand watering is sufficient for smaller gardening projects.
Wrapping up week 0, you can see what I use for soil this year, all 6 cubic yards of it:
 |
| Not pictured: Countless wheelbarrow loads of compost into the Grow Bags |
This ended up being enough dirt for 28 Cannabis plants in my setup, which makes use of a new technology known as 'Grow Bags'. These bags act as planting pots, but they allow excess water to drain out due their aeration technology. This same technology keeps roots from growing through the bag, as roots cease to grow when they come in contact with that much air. These bags are one of the great gardening innovations available, and are available in many different sizes. Grow bags also help keep your Cannabis specimen insect and weed free by providing a much more protected plant/root area than flora growing at ground level.
 |
| A 45 Gallon Grow Bag spread open for all to see |
This concludes Entry 1 for my own Backyard Grow. In Entries 2 and onwards, you can expect to find more high quality media of my garden, including video! Entries 2 and 3 will be in the next week or so, but as soon as I am caught up with the grow season, I'll be updating this my Personal Backyard Grow once a week. Until next time, this is KidBotanical reminding you all to take after your garden, and stay healthy.
Thursday, June 30, 2011
Time to get dirty: Soil
 |
| Courtesy of http://chiotsrun.com |
What is soil? To be technical, soil is the most outer layer of the Earth's crust, in which plants take root. Soil is made up of weathered rock and minerals, as well as organic material such as decomposed animal and plant matter. Because soil is formed from so many different particles, it has different qualities and characteristics based on location. These qualities play a vital role to the health of your plant; for example, if you watered your plant as if you had sandy, desert soil in a location that was higher in clay, the plant would surely drown. Also, soils higher in organic material tend to have a higher pH, meaning more acidic soil, and the possibility of nutrient lockout (Nutrient discussion is for another day, however).
Listed below are some of the different types of soil you may encounter when creating your own Backyard Grow:
Sandy Soil- If you grow or plan on growing in an arid or desert region, this is the soil you will be faced with. Sand is formed primarily from weathering of rocks, so this soil is very poor in natural fertility. Because of the nature of sand's small particles, water drains very easily from this soil, meaning your plants will need extra water during the hotter months of the grow season. On the flip side, because of the drier soil, root drowning and other root problems should not appear.
Silty Soil- Only a select few will have access to this soil, and they are quite lucky. Silty soil is formed through rivers or other bodies of water depositing minerals and nutrients over time. Like sand, it can be fine and granular, but unlike sand it retains water and nutrients much better. Silt is only available to those in fortunate geographic locations, so if you can take advantage of this rich natural resource, I advise it!
Clay Soil- As you may have guessed from my example, clay soil has much less draining power than sand or silt. Because of this major drawback, exclusive clay soil is almost never used. To be effective, clay has to be used with sand, silt, or organic material to provide proper drainage and nutrients. If too much clay is in your soil, you will see your plants suffer from waterlogged roots, and possibly root fungi.
Loamy Soil- This soil is the ultimate; it is a combination of all of the above into one glorious mixture of dirt. Loam combines the water draining of sand with the rich nutrients of silt, and the water retention of clay to make a nutrient rich soil with proper retention and drainage. If you manage to come across this soil in your backyard, consider it your destiny to grow something in this rich medium.
Peaty Soil- Peat is exclusively formed from decaying and decomposed organic matter. As you would imagine, it is very rich in nutrients, and makes a great additive for any soil. Because of its high organic content, though, it is much more acidic than any other soil, and is better utilized as an additive to an existing soil profile. Additionally, organic material requires nitrogen to decompose (see: Nitrogen Cycle), which means in larger amounts, said organic material will be in direct competition with your Cannabis plant for precious nitrogen.
Now you know a little more about the dirt you'll be growing in, but you may be asking what to do if you aren't fortunate enough to have a rich and loamy backyard, a question that I can answer from personal experience.
As a desert grower, I was initially faced with poor sandy soil, but I knew what I had to do. As a general treatment for each hole, I added FoxFarm® Ocean Forest® potting soil. This soil is high in organic material and nutrients, while also being light and aerated, pretty much being the perfect additive to sandy and infertile soil. If Ocean Forest® does not provide sufficient plant nutrition, or if it provides too much organic material, consider adding blood meal or bone meal to the soil, as that will increase respective levels of insoluble nitrogen and phosphorus.
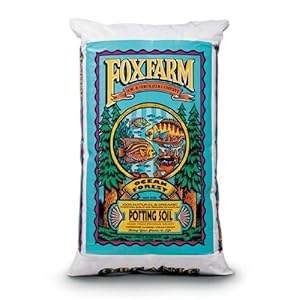 |
| Ocean Forest® Potting Soil, one of the highest quality soil additives |
So in conclusion, a healthy soil profile for your plants is one that drains sufficiently (but not excessively) and contains organic material and nutrition for optimal growth. Due to the wide variance in soil, it will be up to you to determine what should be added or detracted to improve soil quality. As always, I am standing by to do my best to answer any and all questions you may have. I leave you with a few soil related tips, and remind you all to take after your plants and stay healthy.
*Some soils attract different insects than others; recognize your soil type to best combat insect invaders
*Too much water in the soil is as harmful as not enough water
*Experiment with manure and compost; Your soil will improve over time as more and more matter decays
Tuesday, June 28, 2011
Lets start at the very beginning...
 |
| Cannabis Seeds |
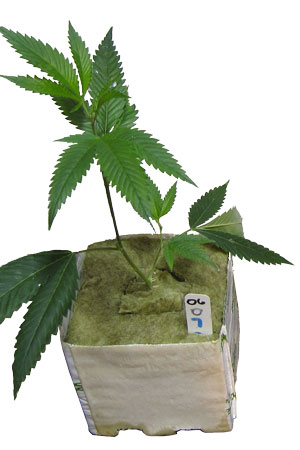 |
| Cannabis Cutting (Clone) |
Like any other plant, a hearty Cannabis specimen will grow from a single seed. This is the preferred method for some growers, however there is an alternative: planting seedlings cloned from a mother plant. The term clone is used in horticulture to refer to descendants of a single plant which were produced by vegetative reproduction or apomixis (Thanks wikipedia). This basically means that small branches are clipped from a mother/master plant, and allowed to take root in special mediums designed for that purpose. So, instead of having uncertain seed genetics, clones give the option of having a genetic copy of the mother plant. The downside is to clones lies in the light shock that occurs when you plant them. Before being sold, clones receive upwards of 12 hours of light per day, which is optimum for growth and health. However, outdoor light will not become 12 hours long until the middle of the summer in most geographic locations, and won't remain that high for very long.
So then, what will this mean for you, the grower? Because the clones have a 2-3 week headstart on the seeds, and their hours of sunlight change, they may become confused and temporarily enter the flowering phase (in which buds are produced/grow larger, happens with less light in the end of the season). Do not be alarmed, as they adjust to the new hours of light, they will shift back into the growth phase. Also, another danger unique to clones comes from climate; if you live in a colder area, clones may be a poor choice due to cooler weather, possible frosts, and low sunlight during the beginning of the growing season.
Ultimately, there will be little differnece between seeds and clones if the same care and dedication is applied equally. Gardening (especially for Cannabis) is very customizable, and all of the different options available make it easy to individualize the growing process. You may still be wondering if clones are right for you, or maybe if seeds will grow better in your particular area. My only answer for you is personal preference plays a large part of the gardening process, whether you grow tomatoes or Cannabis.
Monday, June 27, 2011
Greetings!
Hello, Hola, Bienvenidos, Guten Tag, Aloha, or whatever your language may be, and welcome to what will hopefully become one of the most informative and helpful blogs of all time! This introductory post will cover all current planned areas of discussion, but there is no limit to how many posts may sprout up (Plant Joke 1, the puns have just begun!).
By now, many of you may be asking yourself what exactly is Backyard Grow, and I have only one simple answer. Backyard Grow is a blog founded and dedicated to professional and amateur gardeners alike, who all share the common goal of producing a better product. Our product, however, is unconventional to some. You won't find this in the produce section of your local supermarket, and online availability is risky and limited. At Backyard Grow, our product is Cannabis Sativa.
While there is no denying that both sides of the Cannabis debate have merit, this blog is not primarily for debating such matters. Here we are gardeners and enthusiasts, and take simple joy in knowing we did everything we could to create a healthy and bountiful harvest. Over the course of this blog, I (and hopefully others) will share my own experience to enrich that of others, as we keep the common goal of gardening in mind. For whatever you reasons to grow, I will provide you with the same resources and knowledge I have obtained over the years, through trial, error, blood, sweat, and tears.
Like many things in life, great marijuana comes from a few simple building blocks: Plant nutrition, insect control, soil/water quality, and light are the key ingredients in growing a healthy Cannabis specimen. As you may have guessed from the title, this blog will primarily focus on outdoor gardening, but much of the general information presented can be applied to indoor soil or hydroponic setups. However, it is my firm belief that the best and most bountiful yields can only come from the universe's brightest (as well as least expensive) source of light, the Sun.
This concludes the introduction to Backyard Grow: An Exploration of Outdoor Gardening. Don't want to miss any of the important information coming up? Subscribe today to receive alerts and updates, they may even save some (plant) lives!
For now, this is KidBotanical reminding you all to follow your plants' lead, and stay healthy
Subscribe to:
Posts (Atom)